Understanding fabric analysis:
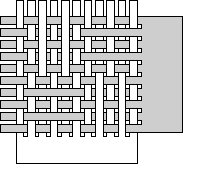
The "fabric" we are analyzing here is a very coarse one - this is just to describe the principle of fabric ananlysis.Look at this picture:
Bergdala Spinnhus |
|
- About 4-shaft counterbalance looms (Scandinavian style) - About multi-shaft (dräll pulley) CB looms - About jämtlandsdräll - Thoughts about "overshot" - Some rag weave facts - Om vadmal - Om färgeffekt - About fabric analyis - bindningskonstruktion (opens in new window) - About construction of double layers - About weaving double width - Double width, part 2 - About profile patterns - How to expand a profile pattern - More about profile patterns - Om tagelvävning - About differential shrinkage - Solid colour? - Om datoriserad vävstol - About old wooden reeds - About reading old literature - About Hulda Peters vävbok - threading notations, part 1 - threading notations, part 2 - About horsehair - Tageltyg från Småland - ideas about displaying - "Original", kopia eller plagiat? - A survey of Swedish weaving books - Om tyst kunskap - Nog nu! in English: - Serial weaving - "TWILL" - Block substitution - Vadmal |
|
Understanding fabric analysis:The "fabric" we are analyzing here is a very coarse one - this is just to describe the principle of fabric ananlysis.Look at this picture: |
|
|
It represtents a paper weaving of the structure you want to analyze.
If you have an actual piece of fabric, you can (carefully) loosen one thread at a time. |
||
|
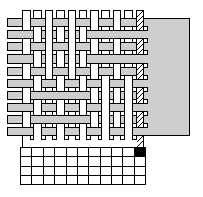
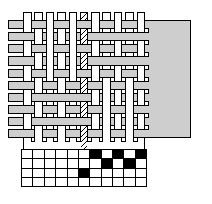
Now look at the first warp end. Assign that to one of the shafts - in this case, shaft 4.
|
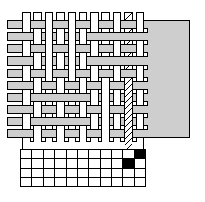
Look at the second warp end. Does it travel exactly the same route in the structure as the first? If not, assign it to another shaft - in this case shaft 3.
| ||
|
|
||
|
Look at the third warp - as it travels exactly the same route as does the first, it gets assigned to the same shaft (shaft 4).
|
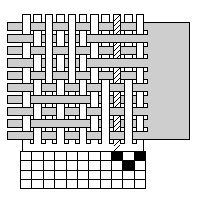
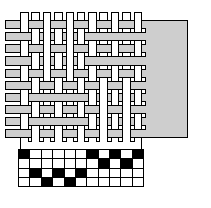
Continue in the same way - every time you find a warp end that does not take exactly the same route through the structure as one of the previous ends, assign it to a shaft of its own.
| ||
|
|
||
|
When you have analyzed one repeat of your structure, you are done - you have your threading done. "Repeat" means that the structure begins again - in this case you have to take my word that it does, after 10 ends. If you are analysing a piece of real fabric, go on looking at the warps until you are convinced the repeat is ended.
|
||
|
|
|||
|
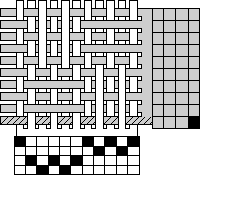
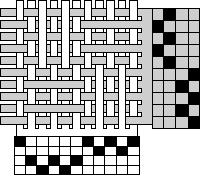
Now, do the same for the treadling - look at the first weft. Assign it to a treadle. |
Continue in the same manner until you have analyzed at least one repeat. Every weft that does not travel exactly the same way as any other weft is assigned to its own treadle. Again, you have to take my word that the repeat is 10 picks long.
|
||
|
|
||
|
|
|||
|
The last stage in doing a complete analysis is to determine the tie-up. |
|||
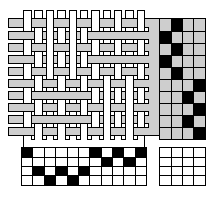
|
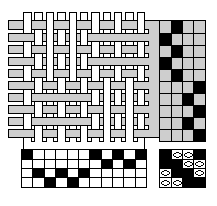
Look at the first weft again: it travels over the first warp end, which is threaded on shaft 4 - shaft 4 has to be lowered. The weft travels under the second end, threaded on shaft 3 - shaft 3 has to be lifted. It goes over the third and fifth ends (which also are threaded on shaft 4), and under the fourth end, threaded on shaft 3.
Further left, the weft travels under the sixth end, threaded on shaft 2, so shaft 2 has to be lifted. It the goes over the seventh end, threaded on shaft 1. Shaft 1 has to be lowered. | ||
|
All this happened when we stepped on just one treadle - treadle 4. We mark this in the tie-up: black squares for lowered shafts, circles for lifted shafts:
|
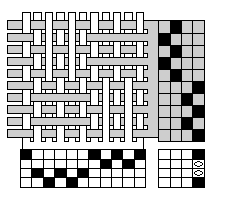
|
||
|
The next weft is woven on treadle 3. It travels under the first five ends, threaded on shafts 3 and 4 - shafts 3 and 4 must be lifted. It then travels over the next five ends, which are threaded on shafts 1 and 2 - shafts 1 and 2 must be lowered. We mark this:
|
For treadle 2 we have to look at weft number six: it travels under ends on shaft 4 - shaft 4 to be lifted. It goes over ends on shaft 3 - shaft 3 to be lowered. It goes over ends on shaft 2 - shaft 2 to be lowered, and it goes under ends on shaft 1 - shaft 1 to be lifted.
| ||
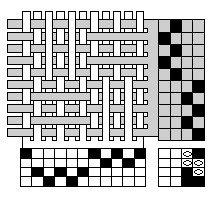
|
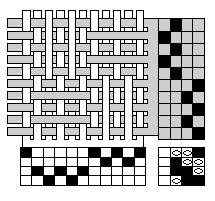
| ||
|
One more treadle, and we are done: wefts on treadle 1 travel over the first five ends - shafts 3 and 4 to be lowered. They travel under the next five ends - shafts 1 and 2 to be lifted. This is what the completed drawdown looks like:
|
|
||
|
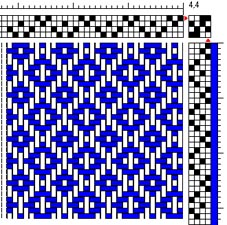
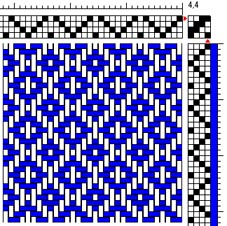
A piece of real fabric is not always as obliging as my example - it may have been torn in the middle of a repeat. This means that sometimes, even when analyzing a common structure, the resulting threading and/or treadling may look different from what is thought of as " normal". The two drawdowns below produce exactly the same fabric, even though the threadings, treadlings and tie-ups are different.
|
|||
|
|
||
© Kerstin Fröberg 2003