To weave double width, part 2 (find part 1 here)
Next, we go on to a more complicated structure, a lace weave. (It is the same structure as in the fabric analysis article.)
Bergdala Spinnhus |
|
- About 4-shaft counterbalance looms (Scandinavian style) - About multi-shaft (dräll pulley) CB looms - About jämtlandsdräll - Thoughts about "overshot" - Some rag weave facts - Om vadmal - Om färgeffekt - About fabric analyis - bindningskonstruktion (opens in new window) - About construction of double layers - About weaving double width - Double width, part 2 - About profile patterns - How to expand a profile pattern - More about profile patterns - Om tagelvävning - About differential shrinkage - Solid colour? - Om datoriserad vävstol - About old wooden reeds - About reading old literature - About Hulda Peters vävbok - threading notations, part 1 - threading notations, part 2 - About horsehair - Tageltyg från Småland - ideas about displaying - "Original", kopia eller plagiat? - A survey of Swedish weaving books - Om tyst kunskap - Nog nu! in English: - Serial weaving - "TWILL" - Block substitution - Vadmal |
|
To weave double width, part 2 (find part 1 here)Next, we go on to a more complicated structure, a lace weave. (It is the same structure as in the fabric analysis article.) |
||
|
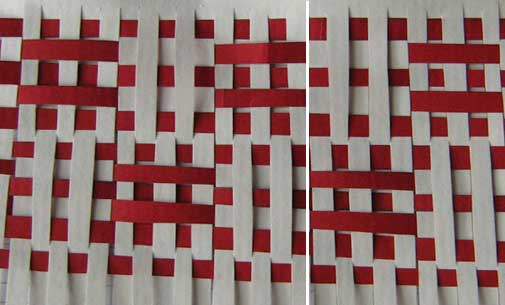
Here is my paper weaving.
|
|
|||
|
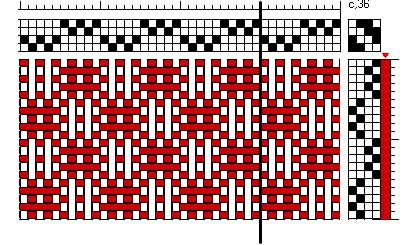
Analysed, it looks like this.
|
|
|||
|
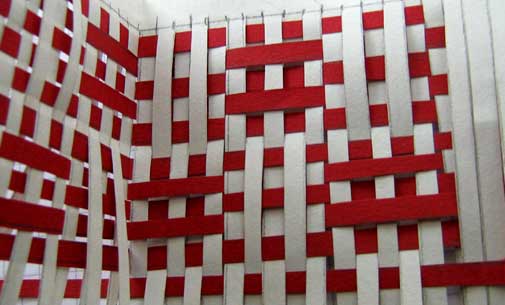
Fold the plaiting like you would have it on the loom. Here, I place the fold to the left.
|
|
|||
|
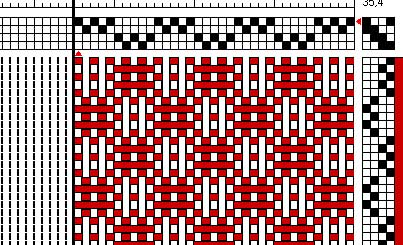
Analyzed, the bottom layer looks like this.
(Fold line marked in black.) Note: all tie-ups are for sinking shed! (To convert to rising shed, just tie the unmarked squares.) |
|
|||
|
Tiem to combine the two. To begin with, I let the bottom layer be threaded on the 4 back shafts (shafts
1-4, in Swedish conventions). The top layer will go on the 4 front shafts (5-8). The tie-ups are marked,
for the bottom layer in the top right corner, the top layer in the lower left corner.
To make the upper layer weavable, the lower layer
has to be tied to sink - herefore the whole upper left corner is marked for sinking.
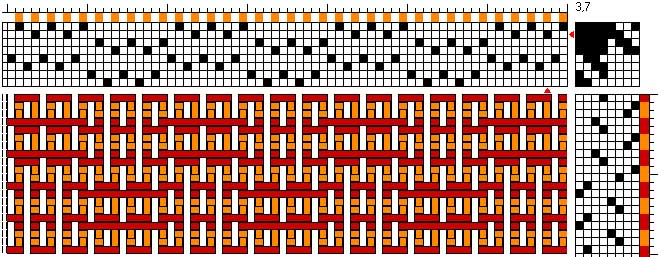
The treadling order is important when weaving double width. This lace structure requires 20 shuttlings
to make the 10 picks needed for one pattern repeat, and they have to come in the right order.
Here, the first pick is in the upper layer, right to left. Going round the fold, second pick is in the
bottom layer, left to right. The weft now exits to the right, from the lower layer - therefore the
next pick has to be in the lower layer, from right to left. Going round the fold, the fourth pick is in the
upper layer, left to right.
Thus, the shuttling order is always top-bottom-bottom-top. To make the draft more "readable" I made the bottom layer (both warp and weft) orange, but the weaving is done with one shuttle/colour only. |
||||
|
This structure, too, can be shuffled. Below is one (of many possible) way of threading, tie up and treadling
as simple as possible:
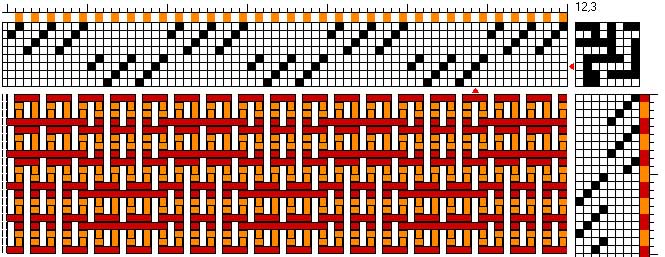
But how was that done?
Think like this: cut your threading, including the tie-up into strips, one per shaft. Now you can move around the threading until it looks easier to handle. The tie-up will change automatically. (It is not always possible to make the threadings as easy as one would like to...) When that is done, do the same for the treadling, still including the (new) tie-up. |
||||